Categories
Home Automation

How to add Brilliant Series II (20925) smart plug to local tuya in home assistant

I recently bought a few smart plugs from Officeworks (link) so I can detect when my washing machine and dryer are finished running and notify me. The plugs have energy monitoring so I can tell when they are actively running. They run Tuya, and once connected to the WiFi using the Tuya app, they are compatible out of the box with local tuya for fast control over the local network.

This post will not show you how to set them up and link them to local tuya (see the official documentation here), but provides the necessary DPS mapping in order to get the right energy monitoring data.

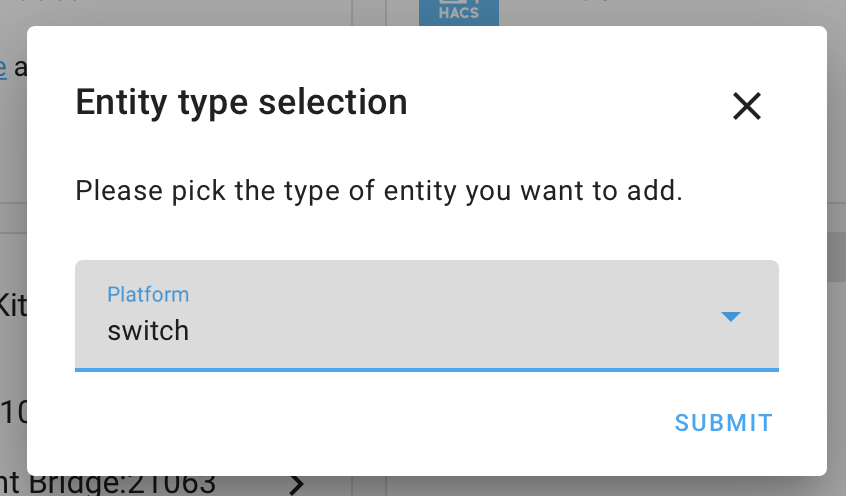
Start the process of adding your smart plug using the local tuya integration from the integrations page. Fill in the key, then click submit. You’ll want to select the type as “switch”, then click submit again.

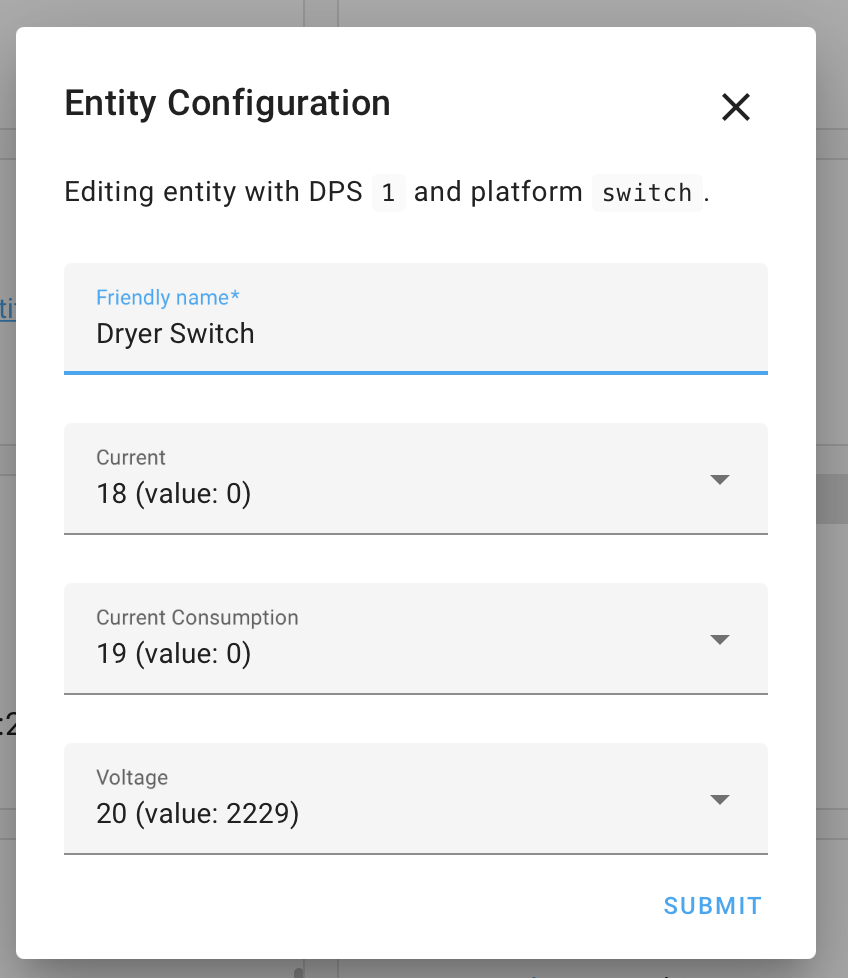
Using the drop down items, select the same numbers as the screenshot below. Once you are done, you’ll have all the energy monitoring data available in home assistant under the switch entity. Easy!

Categories
Home Automation Software

Control your Avocent PDU from python

I got my hands on an Avocent PDU (Model: PM3012V). This thing is pretty cool, it has 20 outlets on it and each one can be remotely switched on or off via it’s control interface. Just plug it into a spare network port and you’d think you’ve got a 20 channel home automation relay bank, well not quite. There is not proper API for this thing meaning you can’t setup your voice assistant (google home etc) or automation software to easily control it. That’s where I come in!

I spent an evening with burp suite, firefox and the awful Avocent web interface. I went through every single network request to and from the PDU the whole way from logging in to commanding an outlet to switch on or off. I replicated these requests in python and culled all the unnecessary ones. End result is the  avocentpdu  module. (super original name right?)

You can check out more information and the documentation on my GitHub repository right here. I’ll post an update once I’ve finished writing my custom home assistant component.

Categories
Home Automation MQTT Uncategorised

MQTT Status Codes (Connack Return Codes)

If you’ve ever played with MQTT, then you’ve probably had issues connecting to your broker. Whether it’s one you’ve setup or you’re using a 3rd party provider like AWS, they should all follow the MQTT protocol. This is mainly for my reference because I can never find it, but below is a list of the standard connack codes that could be returned when you try to connect.

Note these have been directly copied from the official specification. You can see the original by clicking here.

Table 3.1 – Connect Return code values
Value Return Code Response Description
0 0x00 Connection Accepted Connection accepted
1 0x01 Connection Refused, unacceptable protocol version The Server does not support the level of the MQTT protocol requested by the Client
2 0x02 Connection Refused, identifier rejected The Client identifier is correct UTF-8 but not allowed by the Server
3 0x03 Connection Refused, Server unavailable The Network Connection has been made but the MQTT service is unavailable
4 0x04 Connection Refused, bad user name or password The data in the user name or password is malformed
5 0x05 Connection Refused, not authorized The Client is not authorized to connect
6-255 Reserved for future use
Categories
Home Automation

Restart button for Home Assistant on the front end

This is a pretty simple tip, but handy nonetheless.  When you’re busy configuring Home Assistant you’ll probably find yourself restarting it all the time.  So I decided to add a convenient button onto the front end to do it for me.

Basically, you just need to add a switch to the configuration file.  If you’ve set up Home Assistant with systemd according to the official documentation, this snippet should work nicely for you.  I found it gave an error “Failed to call service homeassistant/turn_on” when used.  That’s probably because the server has just been restarted and can’t “confirm” the action has been completed to the front end.

Note:  Do NOT use this unless you’re confident no one else is able to read your configuration file as it contains your password in plain text!
switch:
  platform: command_line
  switches:
    restart:
      command_on: "echo '<password>' | sudo -S systemctl restart home-assistant@<username>.service"
      command_off: "echo '<password>' | sudo -S systemctl restart home-assistant@<username>.service"
Categories
Electronics Home Automation

My home automation system overview (main components)

I’ve been working on my home automation system quite a bit recently.  So far I’ve automated a few things, namely my work room’s light and power, and my bedroom’s light and fan.  When I get around to it I’ll be automating all the outside lights and some more power points.  In this post I’ll quickly go over all the components you need for my home automation system and what they do.

The main components are:

  1. MQTT Broker (Server) – this is the “communications mainframe”
  2. Home Assistant Server – a nice interface/automation server
  3. Server Hardware – I use an orange pi zero
  4. Automation hardware – WiFi relays, sensors etc

1) Mosquitto (The MQTT Broker)

Mosquitto is an open source MQTT broker.  Now the first thing to explain is what is MQTT?  I mentioned it’s like a communications mainframe, well it kind of is.  If you aren’t familiar with the publish subscribe concept I suggest you read up on it.  However, the main concepts are you have clients that connect to a broker.  (MQTT terminology in bold) A client can subscribe or publish a message to a topic.  A topic might look like “sensors/kitchen/temperature”.  When a client is subscribed to a specific topic, that client will receive all messages published to that topic.

This tutorial by Digital Ocean is a fantastic resource for setting up the basics of an MQTT broker.  It’s a great introduction on how to set up a working broker, and how to secure it.  However, I reccomend that you go one step further.  See how to use ACLs and multiple user accounts to limit what topics each client can subscribe and publish to.  This ensures if an account is ever compromised, the damage can be contained.

2) Home Assistant

Home Assistant is an open source, python 3 based home automation hub.  They had me at open source and python 3. 😉 It is fairly easy to use but the killer feature is it’s integration.  It integrates with everything!  I can almost guarantee if you want something integrated it already has a compatible component.

The main components I use are WeMo (curse thee belkin, I should never have wasted my money on a WeMo), chromecast, MQTT, owntracks and pushbullet.  I’m still adding more when I have the time so this list will probably be out of date quickly.  It’s configured with a single yaml file, which is a little annoying and will definitely get convoluted fast.

To see the ever expanding list of built in components check out this link.  In my opinions its the best one out there.  It also has by far the nicest looking interface, it comes with a mobile friendly web app.

3) Server Hardware

This title is slightly misleading as you don’t really need a server.  I bought a few Orange Pi Zeros and have been pleasantly suprised at how well they work.  In Australia, I could get 2 for a similar price as a single raspberry pi zero.  The raspberry pi is also only available in quantities of one at the moment.  But the main reason I like them better for this purpose is the full size ethernet and USB port on board, and the built in WiFi.

The full sized ethernet port is a big plus, makes it so much easier to work with.  However, with great price comes terrible software support.  I didn’t feel that comfortable with a dodgy looking baidu cloud/google drive link for the operating system.  I ended up trying it on only to find out it wouldn’t boot from any “official” image.  However, armbian to the rescue!  They support the orange pi zero and it booted up straight away.  I could see it on my network so I went ahead and installed mosquitto and home assistant.

Here is the official armbian page and download links for the orange pi zero.  I like ubuntu so that what I went ahead with.  Note, neither of these operating systems contains a desktop environment so you’ll have to get familiar with the command line.

4) Automation Hardware

A couple years ago I bought a belkin WeMo for my 3D printer; I wanted to be able to turn it off when it was done and I wasn’t home.  However, it’s a terrible product.  Sorry Belkin, you tried, but it just doesn’t work.  It’s slow, laggy and never stays connected properly.  The only thing going for it is it’s price tag, oh wait I forgot it’s $70.  But at least they make an api available – actually nevermind they don’t do that either.  To be fair it was one of the first plug and play WiFi relays around so I’ll give them that.

My favourite piece of hardware at the moment is the sonoff by itead.  It needs a bit of hacking to get going.  But once you’ve loaded TASMOTA onto it they’re awesome.  TASMOTA is basically plug and play; upload, configure and you’re done.  Basically, you wire a sonoff in between any device/appliance you want to control wirelessly.  I’m renting and have decided not to modify any of the wiring in my house because I value our insurance validity.

NOTE: Do not try this unless you know what you’re doing and you have a qualified electrician look over your work.  Something as simple as mixing up the colour of the wire can cause someone in the  future to shock, injure or kill themselves! (electrical standards exist for a reason)

What I’ve decided to do is buy some slampher‘s to go on my lights where they fit.  You can modify the button and wire one into a blank faceplate.  This means you’ve still got a manual butotn but it’s WiFi connected.  For all other appliances I’m making up power boards and extension boards with a sonoff built in.  This means I can plug anything in and make it WiFi connected – all without voiding my house insurance and upsetting my landlord.

Another option for lightswitches is the sonoff touch.  However I don’t like it’s price tag or the fact I legally have to get an electrician to install it for me.  I’d rather a slampher and DIY button for a fraction of the cost. That being said, they do look really nice.


That’s my brain dump for tonight.  I’ve gone into more detail of my MQTT setup and will eventually do the same for all the other topics. (see what I did there 😉 )  Hopefully this is a good overview of all the major components needed and will point you in the right direction.
Categories
Home Automation MQTT

MQTT – How to use ACLs and multiple user accounts

I’ve previously written about how awesome MQTT is and how it’s an integral part of my home automation system.  This tutorial will show you how to make your MQTT broker more secure.  In any sort of information technology you should always use the principle of least privileges.  Basically, only give each account the bare minimum access that they actually need.

1) Define Needs

Lets use my home automation system as an example.  I’ll limit to just a few clients in this example.  I have my automation server (home assistant), a WiFi light (a sonoff) and a light sensor.  Lets state the minimum needs of each client:

Home Assistant

  • Process all MQTT messages to allow full control of devices and to run automation scripts

WiFi light (sonoff)

  • Subscribes to “cmnd/light/POWER” for control
  • Subscribes to “cmnd/light/UPDATE” for OTA updates
  • Publishes to “stat/light/POWER” for status and confirmation

Light Sensor

  • Subscribes to “cmnd/sensor/kitchen/light” for a manual sensor reading
  • Subscribes to “cmnd/sensor/kitchen/light/set” to change settings
  • Subscribes to “cmnd/sensor/UPDATE” for OTA updates
  • Publishes to “stat/sensor/kitchen/level” with current light level

2) Create User Accounts

We can now see we have three clients with distinct, separate needs.  This is a good case where three MQTT user accounts would be beneficial.  Let’s say our Light Sensor has a security flaw that accidentally exposes the password, we don’t want to give someone full access to our system!

If you haven’t already, follow Digital Ocean’s tutorial on setting up and securing Mosquitto.  To add a new user account is quite easy.  Simply run the following command and follow the prompts to enter a password.

sudo mosquitto_passwd /etc/mosquitto/passwd <new-user>

So in total, you should run 3 commands that look something like these, note how I like to obscure the usernames a little.  Call me paranoid, but it makes them just a little bit harder to guess.

sudo mosquitto_passwd /etc/mosquitto/passwd homeassist
sudo mosquitto_passwd /etc/mosquitto/passwd sonoffswitch
sudo mosquitto_passwd /etc/mosquitto/passwd lightsense
Note: make sure you use a very secure password for the home assitant account as it will have full access!

3) Tell Mosquitto to use ACLs

Open your mosquitto configuration file:

sudo vim /etc/mosquitto/conf.d/default.conf

Add the following line, specifying where you put your ACL file.  (I put mine in the same directory as the passwd file)

acl_file /etc/mosquitto/acl

MQTT has two types of wildcards:

  1. “#” means literally everything and is “recursive” so can only be used on the end of a topic.
    1. example “cmnd/light/#” will receive every message from topics that start with “cmnd/light“.
  2. “+” meanse literally everything but only one level, so one or more may be used inside a topic.
    1. example “stat/+/POWER” could receive the “POWER” message from every device.

Generate your ACLs

Open your ACL file and add your topics and user accounts to it like below.  Note the three types of permissions; there are read, write and readwrite.  Wild cards may also be used. Also, please for the sanity of future you document what each one does!

# Give Home Assitant full access to everything
user homeassist
topic readwrite #

# Allow the sonoffs to read/write to cmnd/# and stat/#
user sonoffswitch
topic readwrite cmnd/#
topic readwrite stat/#

# Allows the light sensor to read/write to the sensor topics
user lightsense
topic cmnd/sensor/#
topic stat/sensor/#

Notice how the light sensors have a similar permission level as the sonoffs?  The sensors don’t need to read/write to the sonoffs so they shouldn’t be allowed.  However, we may want the sonoffs to be able to directly read the sensors.

4) Save and profit ??

Save all the settings and make sure they’re right.  Normally I wouldn’t reccomend it, but it may be useful to right down the usernames and passwords of all the accounts.  This could save a lot of confusion with all the different accounts.  (of course you should destroy the passwords after)

Be sure to restart both home assitant if you’ve got it running and the Mosquitto server so that the changes can be applied.

sudo service mosquitto restart
sudo service homeassistant restart


Let me know how you go or if you run into trouble in the comments below.  I couldn’t find much documentation on actually implementing ACLs and multiple user accounts so hopefully this makes it easier for others.

Categories
Electronics Home Automation

How to use Espressif SDK functions in the Arduino ESP8266 IDE

I found myself wanting to use one of the espressif SDK functions in the ESP8266 Arduino IDE.  It took me longer then it should have to work it out so I thought I’d share it!  The first step is to make sure you’ve got the ESP8266 library and boards setup properly.  (see the documentation) In the sketch you’d like to include the espressif function in, paste the following up the top:

extern "C" {
    #include "user_interface.h"
}

Just replace “user_interface.h” with the name the espressif documentation tells you to.  What this does is tells the arduino IDE to include the espressif library.  (which is a standard C library)  This little trick should also work for any standard C library.

The correct name for each API can be found at the top of the relevant espressif documentation page. (their documentation – choose the latest “NON-OS SDK”)  Here is an example of the force sleep api: