Categories
Home Automation

How to add Brilliant Series II (20925) smart plug to local tuya in home assistant

I recently bought a few smart plugs from Officeworks (link) so I can detect when my washing machine and dryer are finished running and notify me. The plugs have energy monitoring so I can tell when they are actively running. They run Tuya, and once connected to the WiFi using the Tuya app, they are compatible out of the box with local tuya for fast control over the local network.

This post will not show you how to set them up and link them to local tuya (see the official documentation here), but provides the necessary DPS mapping in order to get the right energy monitoring data.

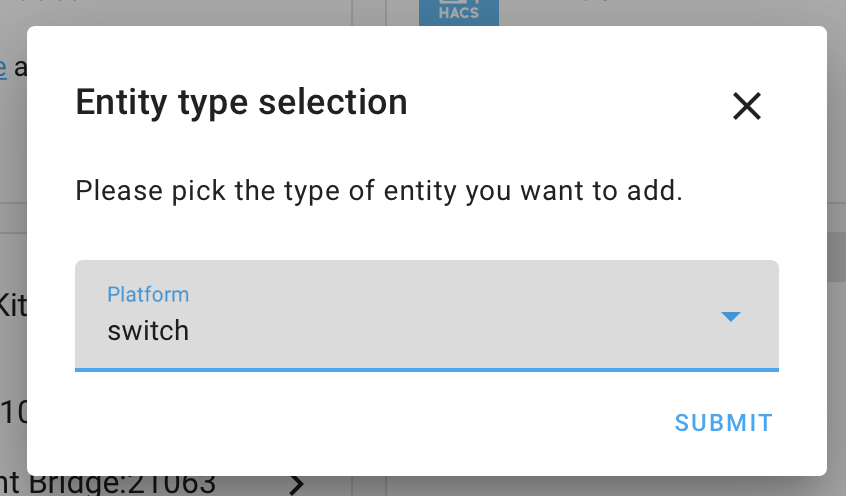
Start the process of adding your smart plug using the local tuya integration from the integrations page. Fill in the key, then click submit. You’ll want to select the type as “switch”, then click submit again.

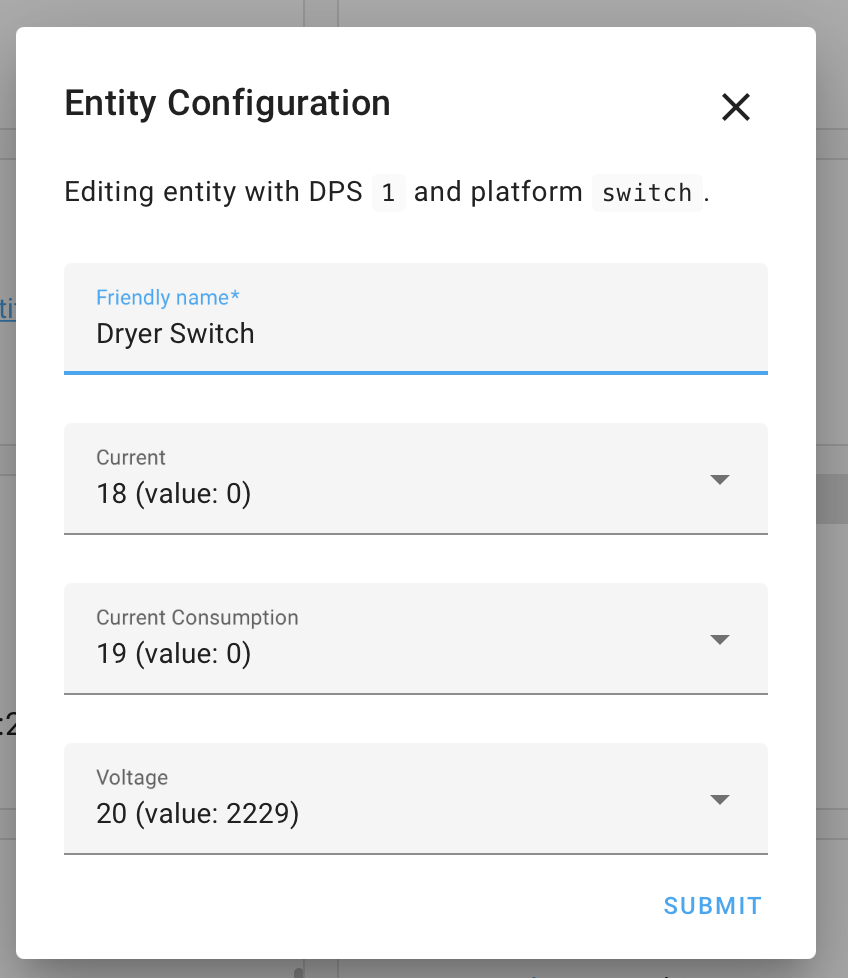
Using the drop down items, select the same numbers as the screenshot below. Once you are done, you’ll have all the energy monitoring data available in home assistant under the switch entity. Easy!

Categories
Uncategorised

How to add OVMS (open vehicles) to Home Assistant

OVMS (Open Vehicles) is a great hardware module that connects to my Nissan LEAF and allows me to perform remote functions like turning on the climate control, checking charge status, range, etc. I’m also a big fan of Home Assistant, and have almost everything in my house hooked up to it. There is no official (or unofficial) integration for OVMS to Home Assistant. However, OVMS has a HTTP API, and Home Assistant supports generic RESTful sensors.

Read on to find out how to hook up your OVMS module to Home Assistant!

Getting Started

Firstly, you’ll need your OVMS module to be hooked up, configured correctly, and working with the default OVMS app. Once your app is connected to your OVMS module and you can see live data coming through, it’s time to move on.

Generating an API Token

You’ll need to generate an API Token from the openvehicles.com API. To do this, you’ll need to open up the Terminal on your computer. Once there, type the command below and hit enter, replacing <USERNAME> and <PASSWORD> with your OVMS username/password that you use to login to openvehicles.com.

curl --location --request POST 'https://api.openvehicles.com:6869/api/token?username=<USERNAME>&password=<PASSWORD>'

After you run that command, you will see an output on your screen similar to the one below. You’ll need to copy your API Token (highlighted in bold) to a safe place.

{"application":"notspecified","owner":"<YOUR_USERNAME>","permit":"auth","purpose":"notspecified","token":"RiVINShnbS0wNG5tJUlNYUZJbUNeR1NcYSdwM0l7aDpWOyE2QkQxSCwrLWh8Ow"}

Find your list of metrics

Now you need to find a list of all the metrics that you want available in home assistant. There are 3 main collections of metrics that the OVMS API makes available. These are Status, Charging, and Location. If you have a 2012 era Nissan LEAF like I do, skip below and copy my config file. Otherwise, read on.

To find all of the available metrics, run the following commands in your terminal. Make a note of all the metrics that you want available in Home Assistant. Be sure to replace <USERNAME> with your username, <VEHICLE_ID> with your OVMS vehicle ID, and <YOUR_API_TOKEN> with the token you retrieved earlier.

Status

curl --location --request GET 'https://api.openvehicles.com:6869/api/status/<VEHICLE_ID>?username=<USERNAME>&password=<YOUR_API_TOKEN>'

Charging

curl --location --request GET 'https://api.openvehicles.com:6869/api/charge/<VEHICLE_ID>?username=<USERNAME>&password=<YOUR_API_TOKEN>'

Location

curl --location --request GET 'https://api.openvehicles.com:6869/api/charge/<VEHICLE_ID>?username=<USERNAME>&password=<YOUR_API_TOKEN>'

Home Assistant Configuration

Now you’ll need to configure Home Assistant to retrieve data from the OVMS API and pull out the metrics that you want. Add a configuration to your configuration.yaml in the sensor section like below. You can update the scan_interval to whatever you’d like, but be considerate and don’t go lower than when your OVMS sends updates, or at a minimum every 60 seconds.

sensor:
  - platform: rest
    scan_interval: 120
    name: car_status
    resource: https://api.openvehicles.com:6869/api/status/<VEHICLE_ID>?username=<USERNAME>&password=<YOUR_API_KEY>
    value_template: "{{ value_json.soc }}"
    json_attributes:
      - soh
      - soc
      - etc...

  - platform: rest
    scan_interval: 120
    name: car_location
    resource: https://api.openvehicles.com:6869/api/location/<VEHICLE_ID>?username=<USERNAME>&password=<YOUR_API_KEY>
    value_template: "{{ value_json.longitude }},{{ value_json.latitude }}"
    json_attributes:
      - longitude
      - latitude
      - etc...

  - platform: rest
    scan_interval: 60
    name: car_charging
    resource: https://api.openvehicles.com:6869/api/charge/<VEHICLE_ID>?username=<USERNAME>&password=<YOUR_API_KEY>
    value_template: "{{ value_json.chargestate }}"
    json_attributes:
      - battvoltage
      - cac100
      - carawake
      - caron
      - etc...

Save and validate

Save the new configuration, and use the handy “Check Configuration” button on the Configuration > Server Controls page. If there are no errors, then restart your home assistant server.

When the server starts back up, you should see some new entities called sensor.car_status, sensor.car_location, and sensor.car_charging. Use this in your automations or expose them via HomeKit like I did! Check below for my full configuration, including HomeKit friendly template sensors (although HomeKit does not support this very well as it doesn’t have native EV support).

HomeKit Example

You can see what this looks like in the screenshot from my iPhone below. I’ve configured the SoC as a humidity sensor so it reads as a percentage, and the range as an illuminance sensor. Unfortunately, HomeKit lacks an EV entity type, so this is the best I could come up with.

If you name the sensors something appropriate, you can even ask Siri to tell you the state of charge or range, if you can deal with the annoying response as it thinks they’re different types of sensors. Hopefully Apple adds an EV entity to HomeKit in the future, so a proper integration can be made!

Example config for a 2012 Nissan LEAF

- sensor:
    - name: car_soc_homekit
      state: "{{ state_attr('sensor.car_status', 'soc') }}"
      icon: "mdi:car-electric"
      device_class: humidity
      unit_of_measurement: "%"

    - name: car_range_homekit
      state: '{{ (float(state_attr("sensor.car_status", "estimatedrange")) * 1.25) | int }}'
      icon: "mdi:speedometer-slow"
      device_class: illuminance

    - name: car_soc
      state: "{[ state_attr('sensor.car_status', 'soc') }}"
      icon: "mdi:car-electric"
      device_class: battery

    - name: car_range
      state: '{{ (float(state_attr("sensor.car_status", "estimatedrange")) * 1.25) | int }}'
      icon: "mdi:speedometer-slow"

- binary_sensor:
    - name: car_charging
      state: "{{ state_attr('sensor.car_status', 'charging') }}"
      icon: "mdi:ev-station"

- platform: rest
  scan_interval: 60
  name: car_status
  resource: https://api.openvehicles.com:6869/api/status/<VEHICLE_ID>?username=<USERNAME>&password=<YOUR_API_KEY>
  value_template: "{{ value_json.soc }}"
  json_attributes:
    - alarmsounding
    - bt_open
    - cac100
    - carawake
    - carlocked
    - caron
    - chargestate
    - charging
    - charging_12v
    - cooldown_active
    - cp_dooropen
    - estimatedrange
    - fl_dooropen
    - fr_dooropen
    - handbrake
    - idealrange
    - idealrange_max
    - mode
    - odometer
    - parkingtimer
    - pilotpresent
    - soc
    - soh
    - speed
    - staleambient
    - staletemps
    - temperature_ambient
    - temperature_battery
    - temperature_charger
    - temperature_motor
    - temperature_pem
    - tr_open
    - tripmeter
    - units
    - valetmode
    - vehicle12v
    - vehicle12v_current
    - vehicle12v_ref

- platform: rest
  scan_interval: 60
  name: car_location
  resource: https://api.openvehicles.com:6869/api/location/<VEHICLE_ID>?username=<USERNAME>&password=<YOUR_API_KEY>
  value_template: "{{ value_json.longitude }},{{ value_json.latitude }}"
  json_attributes:
    - altitude
    - direction
    - drivemode
    - energyrecd
    - energyused
    - gpslock
    - invefficiency
    - invpower
    - latitude
    - longitude
    - power
    - speed
    - stalegps
    - tripmeter

- platform: rest
  scan_interval: 30
  name: car_charging
  resource: https://api.openvehicles.com:6869/api/status/<VEHICLE_ID>?username=<USERNAME>&password=<YOUR_API_KEY>
  value_template: "{{ value_json.chargestate }}"
  json_attributes:
    - battvoltage
    - cac100
    - carawake
    - caron
    - charge_estimate
    - charge_etr_full
    - charge_etr_limit
    - charge_etr_range
    - charge_etr_soc
    - charge_limit_range
    - charge_limit_soc
    - chargeb4
    - chargecurrent
    - chargeduration
    - chargekwh
    - chargelimit
    - chargepower
    - chargepowerinput
    - chargerefficiency
    - chargestarttime
    - chargestate
    - chargesubstate
    - chargetimermode
    - chargetimerstale
    - chargetype
    - charging
    - charging_12v
    - cooldown_active
    - cooldown_tbattery
    - cooldown_timelimit
    - cp_dooropen
    - estimatedrange
    - idealrange
    - idealrange_max
    - linevoltage
    - mode
    - pilotpresent
    - soc
    - soh
    - staleambient
    - staletemps
    - temperature_ambient
    - temperature_battery
    - temperature_charger
    - temperature_motor
    - temperature_pem
    - units
    - vehicle12v
    - vehicle12v_current
    - vehicle12v_ref
Categories
Docker Software

How to build x86 (and others!) Docker images on an M1 Mac

TLDR;

Want a set of commands you can copy/paste? Jump to the TLDR; at the bottom.

Background

I jumped on the Apple Silicon band wagon as soon as I heard how awesome they were and I was not disappointed. My Apple Silicon MacBook Air is now my daily driver that I use for work as a software engineer and for personal projects.

I extensively use Docker in the projects I work on, so this led to a unique problem. When I build a Docker image on my Mac – it builds an ARM version (specifically arm64). This means this image can’t run on any other device like a raspberry pi (linux/arm/v7) or a typical server (linux/amd64) as the application binaries inside are not compatible.

Fortunately, Docker has supported cross CPU architecture builds for a while now through an experimental feature called buildx. It’s a CLI plugin that integrates the Moby BuildKit toolkit. This allows you to build a Docker Image for a variety of different CPU architectures and it uses QEMU under the hood to do the emulation.

How to build a multi-architecture Docker Image on Apple Silicon

This guide assumes you have an Apple Silicon equipped Mac running macOS Big Sur. It was written with an Apple M1 equipped MacBook Air so results may vary across devices.

Step 1: enable experimental Docker Desktop features

The Docker buildx feature is currently “experimental” so we need to enable Docker Desktop’s experimental feature support.

To do so, open up Docker Desktop then navigate to Preferences.

Once you’re there, select “Experimental Features” and toggle the slider to on. Click on “Apply & Restart” to save the changes and restart the Docker daemon.

If you can’t see an “Experimental Features” option, you may have to sign up for the Docker developer program at this link. I suspect it’s a new thing which is why only recently created accounts seem to need to sign up.

Once you’ve enabled experimental features, you can close the Docker Desktop preferences. In your terminal, open the folder that contains the Dockerfile you wish to build for multiple architectures. Run the docker buildx ls command to list the current builder instances. You should see something similar to below.

$ docker buildx ls              
NAME/NODE DRIVER/ENDPOINT STATUS  PLATFORMS
default * docker                  
  default default         running linux/arm64, linux/amd64, linux/riscv64, linux/ppc64le, linux/s390x, linux/arm/v7, linux/arm/v6

Next create a new builder instance with docker buildx create --use so we can perform multiple builds in parallel. Without this step, you’ll have to use the default Docker one which only supports a single platform per build. You’ll see it created if you run docker buildx ls again.

$ docker buildx lsNAME/NODE          DRIVER/ENDPOINT             STATUS  PLATFORMS
reverent_banach *  docker-container                    
  reverent_banach0 unix:///var/run/docker.sock running linux/arm64, linux/amd64, linux/riscv64, linux/ppc64le, linux/s390x, linux/arm/v7, linux/arm/v6
default            docker                              
  default          default                     running linux/arm64, linux/amd64, linux/riscv64, linux/ppc64le, linux/s390x, linux/arm/v7, linux/arm/v6

Now you can use buildx like below to start a multi-architecture build. You’ll have to push it straight to a registry (either the public or a private one) with --push if you want Docker to automatically manage the multi-architecture manifest for you. Don’t forget to tag it (the example is using the open source MemberMatters software I wrote) and add a list of all the platforms that you wish to build for. You can see the compatible platforms from the previous docker buildx ls command. The command below will build an image for both Apple Silicon Macs (linux/arm64), and standard x86 platforms (linux/amd64).

$ docker buildx build --platform linux/amd64,linux/arm64 --push -t membermatters/membermatters .

The first time you run a build, you’ll have to wait for the Moby BuildKit image to download so you’ll see something like this.

$ docker buildx build --platform linux/amd64,linux/arm64 --push -t membermatters/membermatters .
[+] Building 16.5s (7/43)                                                                                                                                 
 => [internal] booting buildkit                                                                                                                     10.4s
 => => pulling image moby/buildkit:buildx-stable-1                                                                                                   8.1s
 => => creating container buildx_buildkit_admiring_shirley0 

Once the build is finished, it will be automatically uploaded to your configured registry. Docker will also automatically manage the manifest list for you. This allows Docker to combine the separate builds for each architecture into a single “manifest”. This means users can do a normal docker pull <image> and the Docker client will automatically work out the correct image for their CPU architecture – pretty neat!

TLDR; Version

  1. Open the Docker Desktop dashboard then open up Preferences (cog icon). Go to “Experimental Features” then turn it on and apply it.
  2. Next create a new builder instance with docker buildx create --use. This lets you specify multiple docker platforms at once.
  3. To build your Dockerfile for typical x86 systems and Apple Silicon Macs, run docker buildx build --platform linux/amd64,linux/arm64 --push -t <tag_to_push> .
  4. Done. Please note that you have to push directly to a repository if you want Docker Desktop to automatically manage the manifest list for you (this is probably something you want). Read the paragraph above to find out why. 😉

Categories
Uncategorised

Update to my electric motorcycle project

For those who don’t know, I’ve been blogging about my electric motorcycle conversion over at https://ebandit.bike. I’ve gotten back into the swing of things now that a lot of places are opening back up after COVID mandated shut downs. I’ve put together a really detailed post explaining all about the BMS, the motor I selected and the ELV system. You can read all about it on my other blog right here.

Categories
3D Printing Electric Skateboard Electronics

Custom lighting system for my electric skateboard

Recently I’ve joined a local electric skateboard group that goes on regular group rides. Unfortunately most of these are at night and I don’t have any sort of lights. It’s dangerous to ride at night as I can’t see what’s ahead of me and others can’t see me.

Instead of forking out a large amount of money for some pretty basic (and boring) lights I decided to make my own. I purchased some 300 LED/m WS2812B strip and a 15W LED light bar off eBay. The light bar requires 12v so I built a 3s3p (12.6v, ~6Ah) battery pack out of 18650 Li-ion batteries. This means I needed a 5v power supply to run the LED strips and ESP8266 micro controller. Products on eBay tend to be overrated so I normally aim for something rated much higher than necessary.

The 5v, 5A power supply used.

I designed and 3D printed a case to fit all of the batteries and electronics inside. It’s a bit bigger than necessary but I wasn’t certain on the size of everything when I made it. I designed it so the light bar attaches onto the front so it’s easier to mount on the board. The cables come out via two waterproof glands for the light bar, and charger (red, black) / led strip (yellow, green, white).

The controller box and light bar mount.

The adhesive that comes on the LED strip isn’t very good. I 3D printed some little plastic holders for the strip instead. Using some tiny screws, these screwed into the board for a really solid mount. Near the back wheels it was easier to use zip ties for mounting the strip.

The underside of the board with the light strips held in place by some 3D printed plastic clips.

The final result is great! It makes a huge difference while riding at night. I can clearly see what’s in front of me, and everyone can see me coming from ages away due to the fancy light show going on underneath the board and huge light bar on the front. 😉

Categories
Uncategorised

My smart home system

I’ve been an eager smart home (or home automation) enthusiast for a number of years now. My end goal is always changing, but it’s generally been to automate as many things as possible and make it as convenient as possible to control all of my lighting and appliances. My smart home system has grown to be quite complex so I’ve started documenting it.

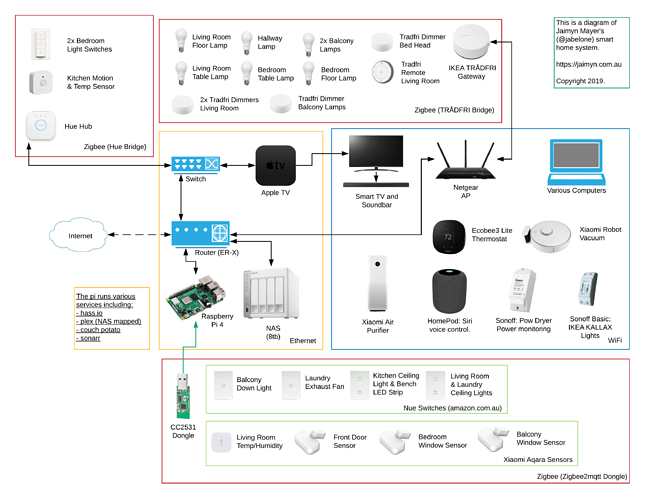
To start with, I’ve put together a system diagram showcasing all of the different components and how everything is connected.

Smart%20Home%20Diagram
A diagram of my smart home system as of January 2020.

Here is a quick summary of all the different protocols and the different components that rely on them.

ZigBee – CC2531 Dongle (zigbee2mqtt)

Zigbee2mqtt is a fantastic open source project. It aims to bring together all the products from various companies so they can all use a single hub. Currently most vendors have a proprietary hub and there’s little compatibility between. This is surprising given ZigBee is an open standard just like WiFi. Zigbee2mqtt has a set of converters that allow you to add support for almost any device and expose a control/status API over MQTT.

ZigBee is “created on IEEE’s 802.15.4 using the 2.4GHz band and a self-healing true mesh network”. It’s especially ideal for sensor and IoT networks as it is a true mesh network that re-organises itself and relays messages between nodes. It’s also extremely low powered which makes it great for tiny battery powered sensors.

I’m slowly moving all of my ZigBee devices onto this network. This allows me to benefit from having less hubs and a bigger, more reliable ZigBee network. Most of my fixed LED downlights have ZigBee light switches that act as repeaters as they’re always powered.

ZigBee – Phillips Hue

Although they’re great, I’m migrating away from the Phillips hue lineup to the IKEA range for consistency reasons. Otherwise, the hue range is the best quality and functioning smart bulbs I’ve used.

ZigBee – IKEA TRÅDFRI

IKEA’s range of smart lighting products is absolutely fantastic. They are incredibly good value, great quality and work well. You can get a dimmable smart bulb for about $15 AUD!

IPv4 – WiFi/Ethernet

All of the ZigBee hubs connect back to hass.io (or home assistant) over a standard IP network using WiFi or Ethernet. There are also various other devices like my air purifier, robot vacuum cleaner, smart thermostat and a couple of WiFi based relays (sonoff). I try to avoid adding WiFi based IoT devices as a lot of them have serious security vulnerabilities. ZigBee is generally much more secure as a breach from any ZigBee device generally can’t give access to the entire IP network.

Raspberry Pi 4

Home Assistant (or hass.io) runs on my raspberry 4 and exposes all of the devices in my smart home system to HomeBridge. This makes everything available to the Apple ecosystem via HomeKit. This allows me to use Siri or the Home app on my watch, iPhone, MacBook, iPad or HomePod to control everything that’s part of my smart home system. This is really convenient and Siri is now the primary way I interact with my smart home system and control lights/other devices.

The Raspberry Pi 4 also hosts several services such as a plex media server and download server. It’s mapped to our NAS which has 8tb of network accessible storage for media, backups and other files.

Conclusion

My smart home system is a lot of fun to build and maintain but it’s not for everyone. Hopefully this post has given you some ideas on how to get started or improve your own smart home.

Categories
3D Printing Linux Raspberry Pi Software

How to get great webcam quality with Octoprint

I have OctoPrint set up to help me manage my 3D printer, record timelapses and remotely monitor it. OctoPrint is a great tool and something I strongly recommend to everyone. I’ve also setup a webcam so that OctoPrint can stream the footage in real time, and also create awesome timelapses. I have a Logitech C920 – one of the highest regarded webcams available, and yet I was still getting poor results. Read on to find out how I fixed this.

The Logitech C920 is a great webcam and can be had for as little as $100. However, in the case of mounting it up close on a 3D printer with a quickly moving subject, the auto focus and exposure really struggles. I’ve got a fixed mount, and a consistent lighting set up in my printer’s enclosure so there’s no reason for the focus or exposure to be adjusted once it’s correct.

Luckily, it’s easy enough to manually configure these settings. These commands were tested on a Raspberry Pi 3+ Model B with a Logitech C920 webcam. Results may vary on other setups.

First of all, you’ll want to turn off auto exposure by running the following command on your OctoPrint Pi:

v4l2-ctl -c exposure_auto=1

Once you have turned off auto exposure, it’s time to play around with the exposure value. A good starting value is probably around 600, but it varies with your specific set up. You should play around with this number by adding or subtracting 100 at a time until you get a good quality image. You can open up the OctoPrint webcam stream while you’re doing this. Run the command below to set your exposure to a value of 600:

v4l2-ctl -c exposure_absolute=600

Now your exposure is dialed in, it’s time to move onto the focus. This was the biggest problem for me as the webcam was hunting for focus all the time resulting in a near constant blurry image. Turn off auto focus by running the command below:

v4l2-ctl -c focus_auto=0
A picture of my 3D printer (CR-10 v2) webcam setup. The printer control box and OctoPrint Pi are off to the left out of frame.

With auto focus off, we can now play around with the focus settings. My webcam is mounted above my 3D printer towards the front, and is about 50cm away from the build plate (pictured above). Start with a focus value of 1 and then work your way up from there by adding 1 at a time. If you’re not seeing much difference between the values, try jumping up 5 at a time then fine tuning it when it’s almost there. Set the focus value to 1 with this command:

v4l2-ctl -c focus_absolute=1

Putting it all together

Now that we’ve got all the settings dialed in, it’s time to make them stick. By default, these settings won’t persist if you reboot your OctoPrint Pi. First you should combine all the commands together like the code snippet below, be sure to replace with your dialed in values:

v4l2-ctl -c exposure_auto=1 && v4l2-ctl -c exposure_absolute=600 && v4l2-ctl -c focus_auto=0 && v4l2-ctl -c focus_absolute=2

You’ll need to open a config file called /home/pi/mjpg-streamer/start.sh. Note, some users have reported that /etc/rc.local is now the correct place (you’ll need to use sudo when editing this). You may have to try both. Use your favourite text editor. If you’re new to editing files on the command line, you should look up how to use nano and come back here once you’re familiar. Create a new line at the very end of the file and the code snippet from above there. Save and exit. Now whenever OctoPrint starts up the mjpg-streamer service your custom camera settings will take affect.

Following these steps helped me dramatically boost the quality of the live stream, and timelapse footage of my prints. It went from over exposed and fuzzy to nice and clear with a good exposure.

Note: I’ve been using the excellent “octolapse” plugin recently which has similar functionality (and a GUI!) built right in. So I’d recommend to give that a go if you don’t mind the extra plugin and complexity.

Categories
armbian Raspberry Pi Software

The fastest way to clone an SD card on macOS

If you have a raspberry pi or other single board computer and would like to make a backup of it, or even clone it to another SD card, then it can take a long time. Your first thought is to probably use the built in “Disk Utility”. Unfortunately this has issues reading linux partitions (well in my experience) and is often slow. This simple command line trick will have you copying or cloning a full disk image of your SD card in record time!

WARNING: Be very careful when running any command with sudo dd in it. If you type any of the parameters incorrectly you may accidently erase or overwrite important data.

Requirements:

  • macOS running a recent version (this guide was tested on macOS Catalina).
  • basic knowledge of command line operations.
  • Make sure you’ve got homebrew installed. You can visit this link to find out how to download and install homebrew if you haven’t already got it.
  • After you’ve installed homebrew, you’ll need to install a package called core-utils. Do so by running brew install coreutils in your terminal. It should take a few minutes to run.

Identify your sd card:

You’ll need to find out which disk your SD card represents. You can run diskutil list and should see an output like below:

/dev/disk1 (synthesized):
   #:                       TYPE NAME                    SIZE       IDENTIFIER
   0:      APFS Container Scheme -                      +500.0 GB   disk1
                                 Physical Store disk0s2
   1:                APFS Volume Macintosh HD — Data     396.0 GB   disk1s1
   2:                APFS Volume Preboot                 81.9 MB    disk1s2
   3:                APFS Volume Recovery                528.5 MB   disk1s3
   4:                APFS Volume VM                      4.3 GB     disk1s4
   5:                APFS Volume Macintosh HD            11.0 GB    disk1s5

/dev/disk4 (external, physical):
   #:                       TYPE NAME                    SIZE       IDENTIFIER
   0:     FDisk_partition_scheme                        *31.9 GB    disk4
   1:             Windows_FAT_32 boot                    268.4 MB   disk4s1
   2:                      Linux                         31.6 GB    disk4s2

From that output we can see that our SD card must be /dev/disk4 as our card is 32GB in size and has a fat32 and linux partition (standard for most raspberry pi images). You should add an r in front of disk4 so it looks like this /dev/rdisk4. The r means when we’re copying, it will use the “raw” disk. For an operation like this, it is much more efficient.

Copy the SD card as a disk image (dmg)

Now you should run the following command, replacing 4 with whatever number you identified as your sd card:

sudo gdd if=/dev/rdisk4 of=sd_backup.dmg status=progress bs=16M

Tip: you can experiment with different numbers for the block size by replacing bs=16M with larger or smaller numbers to see if it makes a difference to the speed. I’ve found 16M the best for my hardware.

You should see some progress feedback telling you the transfer speed. If you’d like to experiment with different block sizes, just type ctrl + c to cancel the command, then you can run it again.

Once the command has finished running, you’ll end up with a file in your home directory called sd_backup.dmg. If you’d like to backup multiple SD cards (or keep multiple backups!) simply replace sd_backup.dmg with a different file name. This will contain a complete disk image of your SD card. If you’d like to restore it, or clone it to another SD card, read on.

Copy the disk image (dmg) to your SD card

You’ll first need to unmount your SD card. Do not click the eject button in finder, but run this command, replacing 4 with whatever number you identified as your sd card sudo diskutil unmountDisk /dev/disk4.

Then to copy the image, run the following command:

sudo gdd of=/dev/rdisk4 if=sd_backup.dmg status=progress bs=16M

Tip: you can experiment with different numbers for the block size by replacing bs=16M with larger or smaller numbers to see if it makes a difference to the speed. I’ve found 16M the best for my hardware.

You should see some progress feedback telling you the transfer speed. If you’d like to experiment with different block sizes, just type ctrl + c to cancel the command, then you can run it again.

Once the command has finished running, your SD card should be an exact copy of the disk image you specified.

Categories
Uncategorised

Untangling the mess that is USB Type C and video outputs

USB Type C is meant to be the answer to all of our problems and be this magic, universal port right? Well in terms of charging things it’s pretty good. We’ve got the USB Type C PD (power delivery) spec that means my Apple charger will work on my MacBook Pro, my Samsung S9+, Samsung Gear Icon X, Nintendo switch, and most things with a Type C port on it. In general I’ve had a good experience with USB C being a truly universal solution for charging devices. However, getting a video signal out of a USB Type C port is another story.

I recently purchased a 2018 MacBook Pro (MBP) 15″ and I’ve been trying to work out how to setup my desk. I started investigating different docking stations, USB Type C adapters and cables, etc. I quickly learned that the world of USB Type C/Thunderbolt 3 docks and video adapters is complex and full of confusion. What’s the difference between Thunderbolt 3, USB3/3.1, “Thunderbolt 3 compatible” devices? Why do some only support mirroring on macOS but extended displays on windows? What is USB Type C alternate mode “alt mode”, etc.

I found myself asking so many questions. As a result I quickly fell into a rabbit hole of trying to understand all the different options that are available on the market. I’m going to attempt to summarise everything I’ve learnt, so that you don’t have to go through the same pain.

Thunderbolt 3 vs USB 3/3.1 vs Thunderbolt 3 “Compatible”

Source: thewirecutter.com

I quickly discovered that there are two main types of docks, proper Thunderbolt 3 ones, USB 3/3.1 ones and Thunderbolt 3 compatible adapters/docking stations. The Thunderbolt 3 options seemed far more expensive than their USB 3.1 and “compatible” alternatives. So what gives? The main difference is the way they communicate with your device, whether that’s a laptop like my MBP or a phone like my S9+.

Thunderbolt 3

Thunderbolt 3 is a standard that’s been developed by Intel to allow you to connect high bandwidth peripherals such as displays and storage devices. However, because of the high amounts of available bandwidth, it’s also used in many docks or “port replicators”. In fact, with the 40Gbps of bandwidth it has, you can drive two 4k displays at 60hz and still have room leftover for other peripherals.

USB 3/3.1

USB 3/3.1 on other other hand, is just the latest revision of the USB (Universal Serial Bus) protocol that has been around for a long time. Thunderbolt 3 “compatible” devices seem to be just a marketing ploy to get people to think they support Thunderbolt 3. Really, they just use the normal USB protocol that Thunderbolt 3 automatically falls back to. USB 3.1 only has 10Gbps of bandwidth compared to Thunderbolt 3’s 40Gbps which means it doesn’t event have enough for a single 4k 60hz display signal. However, USB 3.1 over Type C has a nice trick up its sleeve which I’ll explain later.

Thunderbolt 3 ports are often accompanied by a small lightning icon to signify the fact. However, my MBP and some other devices don’t always do this. Thunderbolt 3 ports will normally fallback to USB3/3.1 if that’s the only protocol the device (such as a dock or adapter) supports.

USB Type C Display Output Methods

There are many different ways that USB Type C devices (laptops and docks etc.) output and interpret display signals. I’ll explain the common ones below.

USB 3/3.1 Over Type C With DisplayLink Chip

USB Type 3/3.1 over Type C docks normally rely on a chip manufactured by a company called DisplayLink (or something similar). These chips use software to encode, compress and send a display signal over the lower bandwidth USB 3/3.1 protocol. However, these chips are software driven so they don’t perform well in demanding applications such as gaming or video editing. They might even struggle with playing some videos. Anything besides general office use is asking for trouble.

DisplayPort/HDMI Over Type C With Alternate Mode

Most cheap USB Type C dongles/adapters rely on on a neat trick called USB C alternative mode. Basically, a dongle/adapter/dock can ask a compatible device like a laptop or smartphone to output a non USB signal at the same time over some unused wires. Some examples of these non USB signals include HDMI and DisplayPort. Yep, the standard protocol that a HDMI or DisplayPort cable carries can also be carried by the humble USB Type C port.

The way this works is the dongle/dock will ask the output device if it’s able to support HDMI/DisplayPort etc. via alternative mode. If it can, the device starts to output a native HDMI/DisplayPort signal straight from the GPU – no software to get in the way like a DisplayLink chip. These cheap adapters are completely passive, basically just joining the correct wires from the Type C connector to the right places ono the HDMI/DisplayPort connector. They don’t manipulate or process the signal.

DisplayPort MST

Part of the DisplayPort standard includes MST – Multi Stream Transport. This handy feature allows you to daisy chain displays, use multiple outputs to drive a high res/refresh rate display, or carry multiple signals to different monitors as a “splitter” from a hub. A lot of docking stations and adapters that support more than one display out rely on MST, which is fine for the most part. However, Apple does not properly support MST in macOS. The only part of MST that’s supported is driving one larger screen from two DisplayPort outputs.

Unfortunately this means a lot of docking stations that work flawlessly in Windows or Linux show a “mirrored” image on both outputs instead of separate images for each. There’s nothing that can be done as a workaround as the problem is macOS fundamentally not supporting it. What this practically means is that some docking stations with multiple display outputs will only show up as a single one in macOS and output the same image on each one.

A Mixture of the Above

You’d think that adapters and dongles would probably pick one of the above methods and stick with it. However, from what I’ve seen most docks that advertise 2 or more outputs rely on some crazy combination of the methods above. Some will have one DisplayPort driven via USB Type C alt mode, and another two with a DisplayLink chip, or two with DisplayPort and MST via USB C Alt mode. This crazy mishmash of implementations and lack of information on product data sheets means it’s difficult for even a tech savvy consumer to work out if something is compatible with their device.

For example, I found this great looking Dell dock for the reasonable price of $200. I was about to buy it when I saw a review saying it only supports one display output on macOS. After looking into this I figured out it was due to the lack of MST support in macOS. I then found a more expensive one for $300 from Lenovo, and thought sweet, this is it. Apparently it uses DisplayPort via alt mode for one connector and a DisplayLink chip over USB for the other two. This means you get one output with “good” performance and the other two are severely restricted in comparison with CPU rendering.

Source: slashgear.com

Passive Dongles/Adapters and Cables

I didn’t spend too much time researching this, but there are still a few problems here. Whilst not ideal, someone should be able to plug a USB C to HDMI into a HDMI to DisplayPort adapter then use it with their screen, right? Well not quite, because of the way USB C video outputs are so varied and inconsistent, it’s unlikely you’ll be able to find the right combination of adapters that will work. It ends up just being easier to buy a new USB Type C adapter for every single type of output you need rather then chaining old ones onto a single Type C to HDMI adapter.

Source: samsung.com

You’d also think that all USB Type C cables are the same right? Well, only certain cables support Thunderbolt 3, and only some cables are rated for higher amounts of power. How do you know? It’s impossible to tell. USB Type C enabled devices are developing into an ecosystem where you have to plug something in and cross your fingers that it all works. This isn’t the way it was meant to be.

Conclusion

Most manufacturers don’t tell you what ungodly mess they’ve got going on inside their products. Because of this complete mishmash, some display outputs will be severely limited in their performance, while the one next to it might be fine. Some docks and adapters may work fine with windows machines but not with macOS. On top of that, sometimes you can’t tell if a USB Type C port, cable or device, is USB3/3.1, Thunderbolt 3, DisplayPort/HDMI over alt mode compatible, etc. It used to be if a cable fit, the device and cable were compatible, but that’s no longer the case.

Consumers shouldn’t need to spend hours researching how an adapter or dock is implemented to work out if it’s going to be compatible with their use case and performance needs. This inconsistency and lack of information from manufactures is a massive problem and is dragging down an otherwise great standard that should be universal and consistent.

P.s. if I’ve left anything out or made any mistakes please let me know in the comments. My head is still spinning from the huge amount of information I’ve processed over the last day while trying to write this.

Categories
Home Automation Software

Control your Avocent PDU from python

I got my hands on an Avocent PDU (Model: PM3012V). This thing is pretty cool, it has 20 outlets on it and each one can be remotely switched on or off via it’s control interface. Just plug it into a spare network port and you’d think you’ve got a 20 channel home automation relay bank, well not quite. There is not proper API for this thing meaning you can’t setup your voice assistant (google home etc) or automation software to easily control it. That’s where I come in!

I spent an evening with burp suite, firefox and the awful Avocent web interface. I went through every single network request to and from the PDU the whole way from logging in to commanding an outlet to switch on or off. I replicated these requests in python and culled all the unnecessary ones. End result is the  avocentpdu  module. (super original name right?)

You can check out more information and the documentation on my GitHub repository right here. I’ll post an update once I’ve finished writing my custom home assistant component.